Wednesday, December 26, 2012

a day on the ranch {guest post}

this is a guest post
sort of
if you would do me the favor
of 
considering me a guest
of my own blog

i have another blog
actually,
my husband and i share it
it is our 
out and abouts
of our very new ranch
today
on the blog and facebook page
i shared a story 
and a recipe
much like i do here
but a bit more
long winded
and with a touch of sarcasm
because
sometimes
when the air is clean
i become
long-winded
and
cheeky
if you have a bit of time
i'd love it
if you would share a bit of it with me
and the ranch
listening
to  little story
that has a 
consolation prize
of
 braised kale with white beans and pork tenderloin

Friday, December 21, 2012

mayan truffle cake

in celebration
that today
 is
rather than
 isn't
i am sharing
a
special treat
to honor the mayans
who
loved chocolate
just as i 
mayan truffle cake for two
3/4 cup whipping cream
1/4 tsp salt
1/8 tsp nutmeg
1/4 tsp cinnamon (plus more for dusting)
1/8 tsp smoked paprika
4 oz bittersweet (70%) chocolate--melted
cocoa powder for dusting
spray 2-8oz ramekins with pan spray,then line with plastic wrap.  set aside
pour cream in a bowl large enough for whipping.  add in the salt, nutmeg, 1/4 tsp cinnamon and smoked paprika. whip to soft peaks. allow to warm a little (you do not want the whipped cream to be super cold for the next step). 
add about 1/4 of the whipped cream to the chocolate mixture and stir until it has been fully incorporated.  this will lighten the mixture a bit, which will make it easier to fold in the cream in the next step.  gently fold the remaining cream into the chocolate mixture.  if your cream is too cold at this point, your chocolate will clump up and not incorporate well into the mixture, so be careful.
pour into prepared ramekins, smooth down the top and place in refrigerator for about 2 hours or longer, if you have the time.
when ready to serve, invert onto serving place and dust with cocoa powder and cinnamon
serve with rich dark coffee

Monday, December 10, 2012

honey spiced latte

i mostly drink tea
but this time of year
i love a festive coffee drink
that isn't filled
with 
syrups and sugar

because we have honey bees
i have a nice fresh stock of honey on hand
at all times

paired with warming spices
it is a delicious addition
to a hot cup of joe

Honey Spiced Latte
perfect for a cool day, or apris ski
1 Tbs honey
dusting of cardamom
dusting of cinnamon
dusting of ginger
4 oz of hot espresso
6 oz steamed milk and foam
Put the honey in the bottom of the mug or glass.  Dust the spices over the honey. Pour the hot espresso over and stir until the honey melts.  Add milk to your liking.  Top with foam and dust with a bit more cinnamon and ginger.  Drizzle honey on top.

Thursday, December 6, 2012

gingerbread construction {tips and tricks}

what is so wonderful about 
gingerbread houses
is that they are always
magical
even when they are a 
big. fat. mess
some years
i do an elaborate construction
(with assistance from hubster-of course)
like this
and sometimes
like this
and occasionally
simple 
like these
but no matter how
elaborate or simple
there are a few things that
are a constant
and 
important
today
i am sharing with you
some of my tricks
for stress free gingerbread house construction

Making Plans
-let the gingerbread dough rest in the refrigerator overnight before baking
-do not construct the house on the same day you have baked the gingerbread, give it a day to cool and settle
-if you buy pre-made gingerbread pieces, make sure they are dry before decorating or constructing
-to dry pieces out (especially in humid environment), place them on a cookie sheet and place in a slow (225-250F) oven until they firm up

Construction Management
-if using a purchased kit, do not, i repeat, do not use the frosting that comes with the kit to assemble the house. it will frustrate the dickens out of you.  make a nice big batch of Royal Icing (alton brown's recipe)
-if you are decorating with mainly candies and sprinkles, construct the house at least 12 hours before decorating---24 hours is best
-if you want the candies to stick, use royal icing.  if you want them to taste yummy, use frosting.
-assemble the walls of the house first, allow to dry for about an hour, then attach the roof pieces.
-prop the pieces up while they are drying, even if it looks like they are staying without a problem.
-allow the house to fully dry, before adhering it to a base

Custom Built
-if perfect corners and straight edges are your thing, use a micro-plane to shave the ends of the gingerbread pieces.
-if looking for a darker hue on your gingerbread, or to paint gum pieces to look like hardwood floors, simply mix a bit of coffee granules into vodka to desired color and consistency and paint it on.  the vodka will evaporate quickly.
-when piping intricate details, use a piping bag with a tip.  you will get consistent results and small detailed lines.
-when using the piping bag, do not over-fill, particularly if you have small hands.  put no more than a cup of royal icing in at a time.
-if you make a mistake and it really bothers you, wait until it dries to easily pick it off
-when doing intricate detail work, it is best to decorate the house before constructing. it allows for more freedom of motion

but most of all
have fun!

i would love to hear any tips you may have for stress free gingerbread construction
or
if you have a question about this topic that i didn't answer
please feel free to ask in the comments

Friday, November 30, 2012

homemade fire starters {diy}

i love the chill of winter
the scent of snow
and
chimney smoke

no matter my hurry
a crackling fire
shifts me to pause
...if only briefly

i repurpose 
simple household items
to make these
useful goodies
 
fire starters
paper egg cartons
dryer lint
cotton kitchen twine
bees wax or leftover candle bits

place the wax/candles in an old can or jar with a wide mouth and place in a saucepan with water filled so it comes about halfway up the jar.  place over low to medium heat, to indirectly melt the wax.
meanwhile.  cut the top off the egg carton, and then cut the egg cups apart. tightly pack lint into each cup, leaving a bit of headroom, so you can close the tops, but folding the corners in.  tie into a bundle using kitchen twine, allow for a fairly long wick, so you can use it to dip the cup into the wax. 
once the wax is liquid, dip each cup into it, allow it to be fully immersed.  i use disposable chop sticks or skewers to shimmy the cup, to make sure it is fully covered.  lay on wax or kitchen paper to cool.  once cool, trim wick and you are ready to go!

*the wax is used to keep the starters waterproof...which is great for campers and hunters.  if you will be using the firestarter in your home, you may not want to add this step.  i always do, because i love the smell of beeswax
**if you really jam pack these with lint, they will burn for 10 minutes or so and smolder for quite some time as well. i find it enough time to get the kindle lit and the logs on their way...


Monday, November 19, 2012

snow globe cupcakes

i love snow globes
when i see grand collections
a tinge of envy
bubbles up
like plastic snowflakes
in a whirl
then 
settling calm
because
the last thing i need
is
 another collection

unless of course
we are talking
 edible
like these little darlings

an incredibly simple project
perfect for
your holiday table
snow globe cupcakes
1 recipe of your favorite cupcake baked and cooled
1 recipe of your favorite frosting
1 dozen plastic clear christmas balls
like these
i picked mine up at michaels 
cupcake toppers 
(deer, trees, house in the woods...
whatever your fancy)
ribbon
imagination

using a sharp scissor or craft knife, cut the top off the ornament
like so
wash and dry the "globe" then sprinkle some of the edible glitter in the bottom.  swirl it around.  most of the glitter will stick, what doesn't will fall to the cupcake when you invert.  if you want lots of "snow" in the globe, brush a bit of vodka on the inside of the globe, swirl the glitter.  it will stick well, and the vodka will evaporate, eliminating any unwanted moisture.  
frost the cupcake as you normally would, place your decorations on top, and carefully invert the globe over the top.  
finish with a little bow


linking to

Saturday, November 10, 2012

Simple Nut Tart

dinner parties
stump me
sometimes

being trained in pastry
there is a certain expectation
dessert will be served
and
it will be from scratch
normally
not a problem
however
occasionally
(particlarly when preparing
a full and complicated dinner)
i don't want to finish
with a
substantial & heavy dessert

sometimes
a simple nut tart
served with
strong coffee
paired with 
a bowl of clementines
is just the trick

 Simple Nut Tart
1 pastry crust, pressed into an 8" square tart tin--baked blind
1 cups walnut--toasted
1 1/2 cups pecans--toasted
1 cup almonds--toasted
1/2 cup pine nuts--toasted
1/2 cup dark brown sugar
1/4 cup granulated sugar
2 Tbs honey
1/2 tsp kosher salt
1/4 cup water
1 oz whiskey
  
preheat oven to 350. place all nuts in a large bowl and mix until well combined.  put brown sugar, granulated sugar, honey salt and water in a heavy saucepan.  stir well, place on medium heat and bring to a simmer.  allow to boil for about 3 minutes.  carefully add the whiskey and bring back to a boil.  boil for 2 more minutes.  the sugar should get a bit syrupy, but should not smoke or turn excessively dark.  keep a constant eye on the sugar.  remove the sugar from heat and tip in the nuts.  stir well, giving each nut a coat of syrup.  immediately tip into the baked crust, gently and spreading to cover the entire crust. pop into the oven for 5-7 minutes. remove from oven and allow to cool before serving.

variations
-add orange juice in place of some water in caramel; a pinch of orange zest & a sprinkle of cinnamon to the nuts
-the addition of fresh rosemary when stirring the nuts into the caramel (light hand) make for a beautiful winter tart
--drizzle with bittersweet chocolate or drench in dark ganache
-substitute vanilla for whiskey
-be creative!


Thursday, November 1, 2012

its on like donkey kong.....jack

we were a bit behind
the '8-ball'
this year for halloween

one hour before we were meant to
pass out candy

hubs and i were still talking about
costumes

we usually go
over the top
with 
fancy make-up
extravagant costumes
and the like

this year
we just raided
hubster's closet

added a bit of facial hair
&
some props

hubs played banjo
for
trick or treaters
while i
dispensed
 valuable advice
like
"pretty tires are for sissy rednecks"
&
"there are two kinds of people in this world, the educated and unducated"
hubster as a foggy bottom boy --i'm si robertson 
(of duck dynasty fame)

I hope everyone had a safe and happy halloween!

Tuesday, October 30, 2012

buttermilk biscuits

when in high school
what we called 
"the roach coach"
rolled up come lunch-time
selling 
all sorts of delicious (read really unhealthy)
food stuffs
once a week
it stopped at kfc
loading up 
on chicken and biscuits

i would queue
for the length of our lunch break
for those biscuits
big, fluffy & buttery
just the nutritious lunch i needed
(ha ha)

those days are long gone
roach coaches
are now gourmet eateries
and i
much more discerning
in my biscuit admiration

 Buttermilk Biscuits
2 cups flour-plus more for kneading
4 tsp baking powder
3/4 tsp salt
1/2 tsp baking soda
5 Tbs unsalted butter--cold & cut into small squares
1 cup buttermilk--cold + more for brushing tops

mix the dry ingredients together in a bowl.  using your fingers or a pastry knife to cut in the butter, allowing for both pea size and smaller pieces of butter.  do not overwork, you want the butter to stay relatively firm and cool.  quickly add in the buttermilk and stir to create a moist dough.  turn dough out onto a well floured surface and press into a rectangle.  do not saturate in flour, but also use enough to prevent sticking. bring the short ends of the dough in, folding into thirds.  give the dough a quarter turn and press or roll again into a rectangle.  fold into thirds.  repeat 2 more times, using enough flour to keep dough from sticking.
after the final turn, roll the dough into a 3/4" rectangle.  use a biscuit cutter to make rounds, or for simplicity, cut evenly into squares.
brush top of each biscuit with buttermilk, and place on a lined baking sheet.  i like to place my biscuits fairly close together, so they bake together a bit. it gives it a little softness around the edges. if that is not your thing, make sure you have at least 1 1/2" separation when placing in pan.  bake at 400F for about 15-20 minutes, or until golden brown.

Sunday, October 21, 2012

sweet potato & swiss chard tart

i was able to pick up
swiss chard
for a song
at this week's market
which means
creating meals 
around this favorite green
has been my charge

this morning
i was longing for
the buttery crust of pie
with the
wholesome chew
of comfort

i threw together this tart
in a jiff
simply using
larder staples
sweet potato and swiss chard tart
1 pie crust--press in to an 8-9" tart pan
1 medium sweet potato--1/4" slice and halved
1/2 onion--halved and thinly sliced
2 cloves garlic--finely chopped
1 Tbs (about) olive oil
1 bunch swiss chard--ribs removed and chopped into thin ribbons
generous pinch salt and pepper
generous pinch freshly ground nutmeg (or small pinch of dried)
6 large eggs
1/4 cup plain yogurt
2 Tbs grated parmesan
2 stems thyme--stems removed (or 1/4 tsp dried)
1/2 cup grated cheese (asiago,white cheddar, provolone, or jack)
preheat oven to 375F.  Blind bake the crust for about 20 minutes.  When you remove the weights, you will fill with the custard and place back in the oven to continue baking.
Heat a large skillet over low heat.  Pour in enough olive oil to just coat the bottom of the pan.  Toss in the potatoes and onions.  Cook until the potato and onions begin to soften. You are not frying for color, you are softening the vegetables.  Toss in the garlic and swiss chard and continue on low-stirring occasionally) until the chard is droopy and has cast off some moisture. Do not let the garlic burn.  Season with salt and pepper and nutmeg
Pour into the par-baked crust and spread evenly to cover the entire bottom
Gently whisk the eggs, yogurt, thyme and parmesan together in a bowl. You want to incorporate the yogurt (eliminating large lumps) without incorporating too much air.  Pour over the vegetables.  
Reduce oven heat to 350F and place the tart on a sheet pan and then in oven.  Bake for approximately 30 minutes, or until the eggs do not jiggle when you gently tap the pan, and the crust is golden brown.

Thursday, October 11, 2012

keeping up with the clampetts (new blog)

i am city folk
however
an old dog can learn new tricks
if
milking a goat
is considered a trick

we are making a move
first emotionally
then
physically

you can follow our progress
through a new blog
written with two voices
mine 
and
hubster

the words aren't
stylized
or
triple worked

the photos
unfiltered

just simply
the happenings
our feelings
triumphs
and
stumbles
with
lots of humor
beginning with the name

we were trying to think of names for the ranch
and summer was in full swing
what was green in the spring 
is now brown
hubs affectionately began calling the place
brown acres
and 
i added in a tag line
keeping up with the clampetts
save for the 
occasional surprise pregnancy and trial separation
(livestock only)
will be more
jed and granny
than
kim and any poor soul with a k as his first initial


as we were making a list of all the equipment we need to purchase
we thought
we really should call this blog
honey i shrunk the nest egg

all references to pop culture
more accurately (gran)pop culture
hey
it is our blog
and we will call it what we want
even 
if it is only funny to us

i do hope
you follow along
so you will be good and ready
when we need a house-sitter 

follow us here


Thursday, October 4, 2012

zucchini chevre spoon-bread

a few days back
hubs
fresh from visiting
our long neglected garden
presented me
with an enormous zucchini
confession
i sorta only grow zucchini
for flowers

occasionally
a few squash survive
when they do
i use them for bread
sometimes 
sweet
sometimes
savory

this spoon bread is a great side dish
it also rocks
scooped warm and soft
as a bed
for 
caramelized onions
sunny side up eggs
and
crispy bacon
best.breakfast.ever

 
zucchini chevre spoon bread
4 large eggs
6 oz olive oil
1 tsp kosher salt
1/2 cup chevre
1/2 tsp freshly grated pepper
1 Tbs honey
1/2 tsp garlic powder
1 tsp fresh or 1/2 tsp dried thyme
3/4 tsp baking soda
1/2 tsp baking powder
2 cups all purpose flour
1 lb (about 3 cups) grated zucchini
1 cup grated cheese (mix of asiago, parmesan and provolone)*
*use your favorite flavorful cheese...if you use a salty cheese, modify your salt to 1/2 tsp

whisk together the flour, baking powder and baking soda in a bowl, set aside.  in a mixer fitted with paddle attachment, beat the eggs and olive oil until pale (about 5 minutes).  add the salt, chevre, pepper, honey garlic powder and thyme.  mix for about another minute at as high speed as you can without splashing.  STIR in the flour until fully incorporated, then stir in the zucchini and cheese.  bake at 375F in an 9" buttered cake tin or cast iron skillet.  bake for about 45-50 minutes.  this is a spoon bread, so it will be soft, but should not be jiggly.  it will set as it cools as well.  serve warm.

linking to
504 Main

Sunday, September 23, 2012

steampunk sheep

steampunk sheep
at the puyallup fair
i couldn't help but think
ol' leroy here
had plans of his own

Tuesday, September 18, 2012

lemon ricotta pancakes

i had originally planned
to be long-winded
and
apologetic
about my absence
then i thought
actions not words
&
i made you these
  
the best part?
none of that pesky
egg-white whipping
and
delicate folding
with their
buttery crispy edges
and
billowy lemony insides
these pancake
say
i'm sorry
and
you're welcome
all at the same time

lemon ricotta pancakes
1/2 cup ricotta 
1 Tbs lemon zest
2 Tbs lemon juice
2 large eggs
1 cup buttermilk
1/2 tsp kosher salt
1/2 tsp baking soda
1/2 cup fine corn meal (floury kind)
1 cup all purpose flour
6 Tbs sugar
whisk together the flour, corn flour, sugar, salt and baking soda. in a separate bowl whisk together the ricotta, lemon zest, lemon juice, eggs and buttermilk.  stir the dry into the wet a bit at a time, to minimize lumps.  stir slowly, and just to get all the ingredients incorporated.  allow to sit about 5 minutes while you heat up the pan.  i like to use butter to cook my pancakes, and i like it to get a bit brown before laying down the batter. but these pancakes are even delicious with pan spray.  
i suggest pureed fruit, fruit syrup or a glaze made with lemon juice and powdered sugar as a topper. 


Thursday, September 6, 2012

pockets full of gold

i'm fresh from 
a long hot bath
irresponsibly
hot
irresponsibly
long
washing the day's
dust and doubt
you see
today 
hubs and i
inked the deal
The Deal
the deal that
moves us from
the cloud side of the rainbow
to 
the pot of gold

1988
is the year i graduated college
freshly minted diploma in hand
this same year
i was certain
a 100 year old farmhouse
on 10 acres
in small town montana
found in the classifieds
was my perfect next step

you may have guessed
instead of the house
on the range

i moved back home
picked up a dumpy rental with friends
and 
started my professional journey
a fabulous time
with 
great stories
interesting triumphs
love

hubster and i
have been talking about a different life
since the day we met
the type of life imagined
as a fresh faced grad

these many years later
it is happening
rather than a two story farmhouse
in a corner of montana
we are closing on
a doll of a house
perched on a hilltop
presiding over 60 acres
and a trio of yaks
today
we walked the land
with the seller
crossing from one end to the next
down a sloping trail
walked by natives
missionaries
herds of cattle
wild pigs
landowners
trail horses
and
us
hubster and i
both agree
we should make this walk daily
filling our boots with dust
our lungs with fresh breath
and
our
proverbial pockets
with
gold

Friday, August 24, 2012

buttermilk fried chicken

my last meal
would include
fried chicken
to me
it invokes
warm summer nights
picnic loaded convertibles driven by dapper gents
barefooted at the shore
grand times
and
a happy childhood

forget the trimmings
serve me up
a crispy breast
a slather of honey
&
leave me in my memory
Buttermilk Fried Chicken

*this recipe was previously shared in 2010


Monday, August 13, 2012

simple summer tartlettes

this is not a recipe
more
an idea
of 
what can be done
with
fresh
peak of the season
fruit
simple summer tartlettes
nectarines
apricots
marzipan
puff pastry
sugar
cinnamon
line tartlette pan with puff pastry, rolled to 1/8th inch thickness.  place in the refrigerator to get nice and cold.  meanwhile, thinly slice fruit, keeping skin on.  roll out marzipan to an 1/8th inch sheet and gently lay a round into the bottom of the pastry lined tin.  arrange fruit in a thin layer on top.  sprinkle a bit of sugar and cinnamon on top (like you would salt and pepper...do not be heavy handed).  bake at 400 until the pastry is browned and crisp (about 15-20 min).
serve with vanilla ice cream or a dollop of creme fraiche.

Saturday, August 4, 2012

homemade feta

making cheese
can be
labor intensive
but
not difficult
it requires
attention to detail
a super clean work area
few specialty ingredients
and
patience

feta cheese
is
aged in a brine
making it
salty and creamy
  
Feta Cheese
1 gallon pasterized goat's milk (do not use ultra-pasterized)
1/4 tsp aroma B mesophillic starter 
4 drops (double strength*) rennet
1/4 cup non-chlorinated (bottled) water
butter muslin
flake sea salt or kosher salt
for brine
8 cups water
1/2 cup kosher salt

heat the goat's milk slowly in a large heavy stock pot to74F. remove pot from the flame and burner (but leave on stove), and gently stir in the mesophillic starter. allow to sit for 10-15 minutes before moving on to the next step.
meanwhile, mix the rennet into the 1/4 cup water and after the wait time, gently stir into the milk pot.  do not scrape the sides or bottom of pan, but gently stir for about 2 minutes.  cover the pot and leave on the back of the stove undisturbed for 12 hours. (the objective is to keep the milk at the 74F for the entire time)
after 12 hours, gently ladle the curds into a muslin lined colander (over a bowl if you wish to keep the curds). allow it to sit uncovered for 1 hour
after 1 hour, tie the ends of the butter muslin to create a pouch that can be suspended or hung**.  i tie the pouch to my sink faucet and allow the curds to drain directly into the sink. it is also easy to run a wooden spoon through the knot and suspend the pouch over a deep pot.  
allow the curds to drain for a full 12 hours
open the pouch remove the curd mass (it should be fairly stable) and flip it over. return it to the butter muslin and suspend for an additional 12 hours.
**an alternative:  after you have drained the curds for the initial 1 hour, you can transfer the curds to a muslin lined plastic tomato basket, flipping every couple of hours.  this will give you a more uniform shape.
remove the curd, which should now be quite firm, from the cheesecloth and place on a draining mat, or surface that has small holes (cooling rack, pizza pan, bamboo mat).  cut the curds into desired size (about 1"x1" or larger for interesting presentation).  lightly salt all sides of the pieces and allow to dry for 3-5 days uncovered in your refrigerator. you are looking for the pieces to become a bit yellow on the edges.
prepare your brine with enough advance that it is cooled to approx 60F by the time you are ready to use it (you can store it in the refrigerator if made in advance).  to prepare the brine, simply boil the water and add the salt. stir to dissolve completely.

when ready to brine, place the dried cheese pieces in a glass jar, careful not to jam and pour the brine over. cover the jar and brine the feta for 2-3 weeks before enjoying.  you will notice the flavor builds as time progresses.  if stored properly, this will last about 6 months (although i dare say it is so delicious, it probably won't make it that long!)

i find the brine a bit salty, so i quickly rinse my feta in non-chlorinated water, and gently dry with a paper towel before eating
it is delicious & beautifully presented with strong black olives, a bit of hot pepper, and a drizzle of olive oil.


Tuesday, July 31, 2012

foodie to foodie {july pen pals}

i think
foodie pen pals
is single handedly
saving the postal service
each month
about a thousand packages
go 
flying across the world
filled with
goodies
tailored to individual tastes
what the sender knows of the receiver
is very little
he/she may read your blog
or
ask what you favor
wonder about allergies
&
food true loves
then
pops a whole lot of goodness
in the hands of 
parcel post

july was my second month of participation 
in
foodie pen pals
dreamed up and managed by
lindsay of the lean green bean
it is a whole lot of fun
and
anyone can join...
....it isn't just for bloggers
so
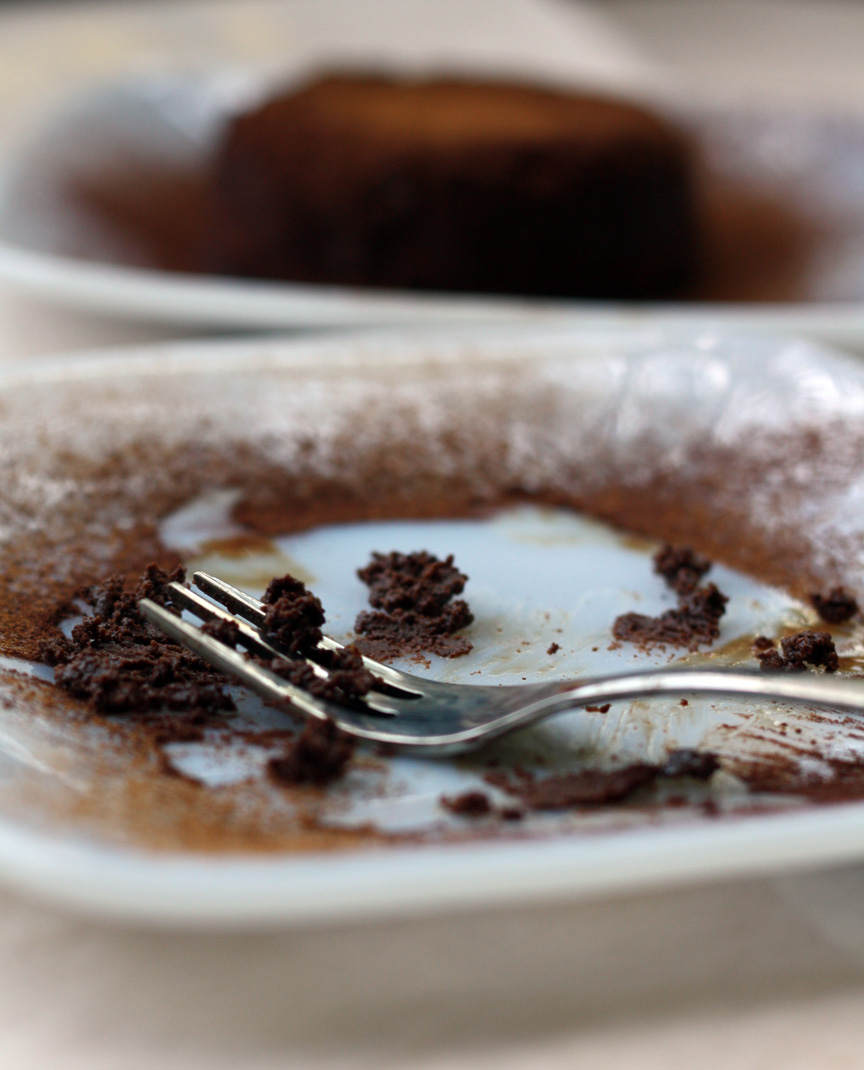
on to the treats i received
a darling gal named marisa from the college cuisiner
put together a really special package 
first let me say
i am a bit sappy
but
there is a rule
the package must include something written
well
marisa
knocked it out of the park
it made me teary eyed
can you see it?
it is a journal
with recipes and ideas and food quotes
bound in leather
that SHE made
it is wonderful!
i have already decided to "borrow" the idea
along with this fabulous gift
the box was filled with all the things i love
crunchy homemade kale chips
(already gone)
quince jam her sister made
(already opened and enjoyed)
delicious almond butter
(also gone)
green tea for my morning pick me up
(not gone, but well on its way)
a personal chocolate milk
(which i am saving for a weekend mocha marathon!)
and some amazing crackers
what?
no photo of the crackers?!
that might be because
they. are. gone. too
hmm
well
marisa did offer this quote in my new favorite journal
so it is kinda her fault
thank you marisa
i truly loved everything in the box
oh
there were also bubbles
which are so much fun
i broke them out immediately
figuring our african grey would find them amusing
no g
he kept telling me to
"knock it off"

i sent my package to heather
who is also in california (like me)
but doesn't have a blog
she was kind enough to
send a little post along
for me to share with you
about 
what i sent her
take it away heather!

I was the recipient of Christy’s box this month for Foodie Penpals, and was I thrilled with the amazing things she sent.  The first thing that was great about my pen pal this month was getting to discover Christy’s blog.  She has some great recipes!  My eggplants are finally ready for picking and I tried her eggplant involtini recipe, which was fantastic. Her box was just as wonderful and Christy must be a mind reader for things people will love.  
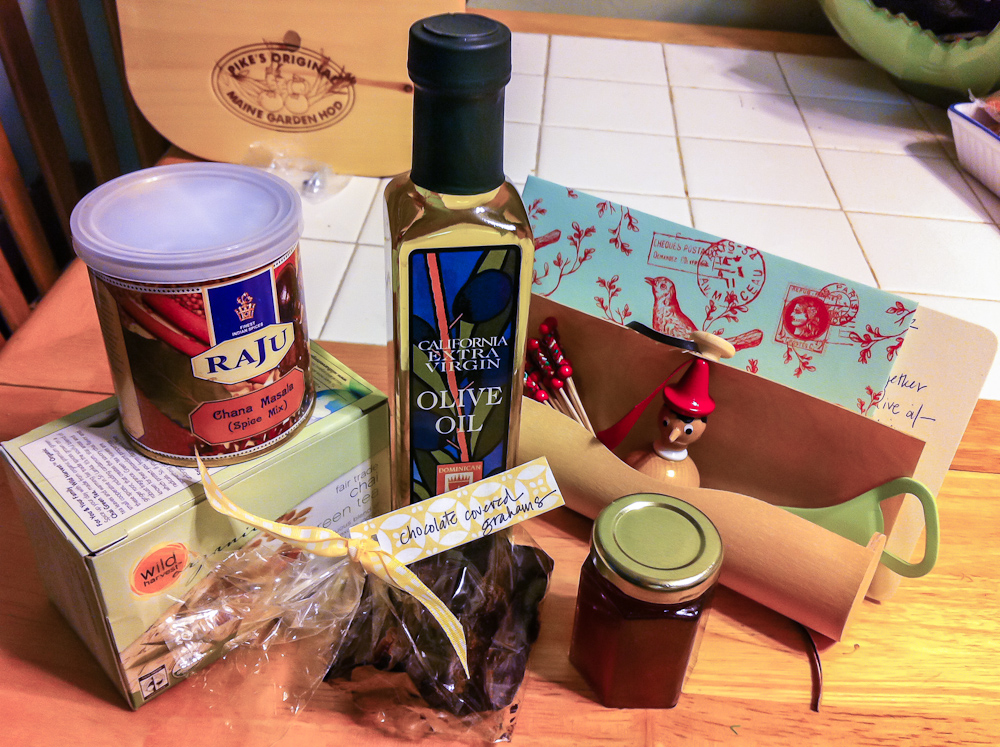
The first thing I noticed was a tin of Chana Masala.  I did not tell Christy this, but I just went to a friend’s wedding in India this April and I am on an Indian food kick.  It smells wonderful and is all set to be used for this tandoori salmon recipe I want to try out this weekend.  There was a box of green tea chai.  I don’t drink coffee, but looking at my desk at work right now, I have at least 8 kinds of tea and this is a great addition to the mix.  The chocolate covered grahams were delicious and did not last long after the picture was taken.  The olive oil is so good drizzled on a fresh picked tomato with a pinch of coarse salt. I have already made a note to get more of this oil when I run out. As if everything wasn’t wonderful enough already, Christy has also given me some of the wildflower honey from her hives.  I am so jealous about her having beehives and the honey is so good that I haven’t figured out what is the best way to enjoy it yet. I don’t want to waste it on something that won’t really showcase the really floral flavor.  On top of the food, I got a neat little bundle of the cutest things.  There is a Pinocchio bottle stopper, adorable.  There are also some cute little picks that will be fantastic on a cheese platter. And finally, a handy bottle opener that will be added to the wine opener in my picnic basket, since I always forget it doesn’t open bottles.
Thank you so much for all the delicious and fun treats, Christy.  Your box was thoughtful and I appreciate everything you sent!

if all this seems like fun to you
join up


Sunday, July 29, 2012

chard & ricotta pie


up at the cabin
i don't always have a full larder
but
i do have a garden
and
a few cheats in the freezer
which leads to
simple
creative
dinners

i was able to whip this
up in a snap
mostly because
our garden overflows
with 
chard
 chard and ricotta pie
10 sheets filo dough
olive oil
grated parmesan

1 garlic clove--finely chopped
1/2 medium onion--finely chopped
2 Tbs olive oil
1 bunch (about 12 large leaves/4 cups chopped)--chopped--discarding stems


1 cup ricotta cheese
1/4 cup grated parmesan
2 eggs
1 tsp lemon juice
1/4 tsp red pepper flakes
1/4 tsp freshly grated parmesan
a few turns of the pepper-mill


use an 8x10 pan.  layer the filo by brushing each sheet with olive oil, and a light sprinkle of parmesan cheese.  the bottom layer should be 6 sheets.  trim the ends and set aside.  
in a large skillet, heat the olive oil on low--toss in the garlic and onion.  cook just until the onions begin to sweat and turn translucent. do not allow the garlic to brown.  toss in the chard and allow to wilt, giving a good stir to evenly cook.  after about 5 minutes, toss in about 1/4 cup of water and cover.  allow the chard to get nice and soft. allow to cool slightly. strain off the liquid and place in a bowl.  add the ricotta, parmesan, lemon juice, red pepper flakes, and pepper.  
evenly spread into the prepared filo crust.  
take the remaining 4 leaves of filo one by one and scrunch them in a loose accordion.  place on top of the spinach layer, making sure to cover the entire top of the pie.  drizzle with olive oil and sprinkle a bit more cheese.
bake at 375F for about 30-35 minutes.  you will look for the filo to be nice and crispy.
serve warm or room temperature. 
this is very easy to crisp up in the oven for a "next-day" treat!

Friday, July 20, 2012

lemon lavender cake

i love lavender-trimming day
delicate buds
not yet spent
but 
given their pollen
to the bees
at the ready
for
culinary cajoling

i bundle the limping stalks
tacking my baker's rack 
with 
lines of purple
a
scent of  Provence
filling the air

i toss the dried buds
in everything 
from
simple syrup to custards
aioli to bitters
shortbread to biscotti

i especially love it
in this cake
lemon-lavender cake
(this is a riff on a classic 1-2-3-4 cake)
Cake
1 cup unsalted butter--room temperature
2 cups sugar
3 cups flour
4 large eggs
1 cup buttermilk
½ tsp salt
½ tsp baking soda
1 Tbs lemon zest
juice of 1 large lemon
1 generous tsp dried lavender buds

Cream butter and sugar until light and fluffy. Add eggs one at a time fully incorporating after each
addition. Stop and scrape down the sides with a spatula and resume beating until the mixture looks like
buttercream frosting. Meanwhile…in a separate bowl, whisk together the flour, salt and baking soda.
Combine the lemon zest, lemon juice and buttermilk together. With the mixer on low, alternately mix in
the flour and buttermilk, beginning and ending with the flour, in 3 additions. Do not over-mix, just allow the ingredients to come together. Stir in the lavender. Pour into 2 loaf pans that have been coated in pan spray. Bake at 325 F for approximately 50 mins. Check for doneness after 40 minutes. Cake is fully baked when a toothpick inserted in the middle comes out clean.When cool, pour glaze over
Glaze
1 cup powdered sugar
1 Tbs cream
Juice of lemon (more or less to your taste)
Stir together and pour over cooled cake.


i've linked my cake up to this great weekly party
Photobucket

Friday, July 13, 2012

ripe figs with ricotta & honey

it is a given

if i were to find myself
naked
roaming the garden of eden

surely i would be
occupied
with
plucking and eating figs
not with
modesty
of.
any.
sort.

figs are good
fresh or dried
plain
&
gilded

for a simple and gorgeous treat
serve these
as an appetizer or dessert
gilded figs
ripe fresh figs
ricotta cheese (fresh if you can get it)
sea salt
honey
toasted walnuts

slice the figs in half, and put a generous scoop of fresh ricotta on top.  drizzle your best honey to just cover the ricotta, sprinkle a few grains of sea salt and top with a walnut half.  serve chilled or room temperature.
**tastes great accompanying a cold glass of prosecco


LinkWithin

Related Posts with Thumbnails
 

blogger templates |