Thursday, July 29, 2010

well groomed {groom's ruffled tuxedo shirt cakes in miniature}

i thought the cupcake trend
might have ended by now
or at least slowed down
but
it ain't happening

as a matter of fact
it seems to be spreading
like wild fire

which is fine with me
because frankly
cupcakes are less tedious than cake

there,
i said it
cake is not really fun
nostalgic?
yes
tasty?
certainly
fun?
no

there is no"crumb layer" on cupcakes
i rest my case

 if you are not convinced
exhibit a
a lovely birthday cake

enjoy

and now 

exhibit b
i give you small cakes
for the groom
fun and delicious
red velvet cake
(printable recipe)
*this is not my recipe...it is adapted from bobby flay's throwdown cupcake challenge
i changed some of the measurements slightly.
3 cups all purpose flour
1 1/4 tsp baking soda
1 1/4 tsp kosher salt
3 Tbs cocoa powder
1 1/2 cups vegetable oil
1 3/4 cups granulated sugar
1 1/4 cup buttermilk
3 eggs
3 Tbs red food color
1 1/4 tsp vinegar
2 tsp vanilla
1/8 cup water
in a bowl, whisk together the flour, baking soda, salt and cocoa powder and set aside.  in a mixer set with paddle attachment, place the sugar, oil and eggs and beat for 5 minutes.  add the buttermilk and beat for just 1 minute or so, until it is all well blended.  add the food color and mix slowly (otherwise you might be wearing it), add the vinegar, water and vanilla.  beat for just about a minute more.  slowly mix in the flour mixture and just mix until it is all fully incorporated, then put the mixer on high for about 5 seconds.  turn off and you are ready to go. you can make 2-7" rounds with this recipe or about 2 dozen cupcakes.


Monday, July 26, 2010

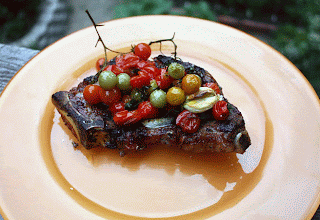
Tuesday Night Supper Club--Grilled Steak with "Pizza Tomatoes"

when the tomatoes are bursting off the vine
i can't help but try and work them into every dinner
tonight is no different
i call these pizza tomatoes 
because, well
your kitchen will smell like a pizzeria
you might want to have some good bread handy for a taste test
Grilled Steak
keeping it simple is the story of the day. i let my steak come to room temperature for about an hour. before throwing the steak on the grill, i rub it with a smashed garlic clove and drizzle a bit of olive oil on it.  i season with a bit of salt and pepper and then grill it to a nice medium rare.  just as it comes off the grill, i squeeze a bit of lemon on it. 
Pizza Tomatoes
as many small tomatoes as you can get your hands on
a handful of garlic cloves-peeled and smashed
lots of fresh herbs
oregano, thyme and rosemary
olive oil
 kosher or sea salt
pepper
balsamic vinegar (optional)
throw the tomatoes, garlic and herbs onto a sheet pan.  drizzle with olive oil..be generous but don't let them swim in it. sprinkle on some salt and pepper and then pop into a 350F preheated oven.  let cook until they burst and are all soft and gooey.  remove from oven and then drizzle with just the tiniest bit of balsamic vinegar (if using).  
you can eat these hot or room temperature. they are great with beef, chicken or even a nice piece of fish.
EAT UP!
and don't forget. beginning next week we start the Tuesday Night Supper Club link-up. share your favorite go-to meal of the week. check out the how-to's here.
Tuesday Night Supper Club


Saturday, July 24, 2010

sweet treats for the picture show

growing up
the drive-in was a summer treat
we'd load up the country squire
with blankets, pillows,
and kids
and drive for what seemed like ages
to see the latest Disney flick
snuggled in the "way back" 
having already had our evening bath and dressed in our jammies
we gorged ourselves on popcorn and candy

tonight
i hope to repeat history
sans country squire and Disney flick
we are headed to the drive-in
a group of adults
in suv's and convertibles
dressed in summer frocks with cashmere wraps and throw pillows
with every intention
of gorging ourselves
on olive oil and parmesan cheese flavored popcorn
and hand dipped chocolates
i can hardly contain my excitement
I like to use bittersweet chocolate for my treats.  
These are very simple.  
You must temper your chocolate so they retain sheen and snap when set.  Jacques Torres is the master and he has a simple microwave method that works great.  Check it out here
I simply made dots of chocolate with a spoon onto parchment paper and added sprinkles.  One bite and you will be hooked!
Milk duds rock--I love them. But I also love my teeth. So, rather than test my luck tonight, I decided to make a bit softer caramel and dip it in bittersweet chocolate. 
 The feature tonight is SALT, so I added a bit of fleur de sel for whimsy. 
I wonder if anyone will get the connection.
  If you don't want to make caramel...no sweat...you can buy some at any good candy making or cake decorating shop...shape it and then dip it in tempered bittersweet chocolate.  the design on top was simply made by lightly tapping the top with the tines of a fork.  If you want to make the caramel, try this recipe from joyofbaking.com--i would add a nice pinch of kosher salt to it.  this recipe from the culinary institute is also good, but you need to double it to get nice thick caramel squares. When making caramel a good thermometer and heavy pan is important. Make sure you test the accuracy of the thermometer by dipping it in boiling water...it should read 212F (unless you are at high altitude, and I will let you do the math!).
Do they even sell these anymore? I used to love the commercials for goobers and raisinets...the chocolate covered treats. I think they have lost out to chocolate covered cookie dough and gummy bears as of late.
 I had a bit of tempered chocolate left, so I dropped a handful of salted virginia peanuts into it and stirred it up. (*my friend julie tells me that they sell blistered peanuts at trader joes now..i think they are similar to the virginia peanuts...but any peanuts will do--just make sure they are salted). I separated the nuts from the clusters and let them firm up on a piece of waxed paper.  I already know I didn't make enough of these...they will be a favorite for sure!
i am linking to around my family table's tip-day thursday

Wednesday, July 21, 2010

the road to hana is lined with banana bread

dying bananas 
(as i like to call them)
pile up in my freezer
i can't bring myself to throw away
bananas that are just too ripe to eat
so 
i plop them in a freezer bag
where they lay in wait
for me to be inspired

on the island of maui
stretches the road to hana
a beautiful picturesque
and windy road
lined with roadside stands
 each selling
the "island's best"
 banana bread
each recipe unique
handed down for generations
and while 
all different
all were tasty
i know
we tried them 

sitting here in the warmth of sunny southern california
i can only dream
of our days on the island
and on which curve
our banana bread stand would sit

Island's Best Banana Bread
(printable recipe)
1/2 cup butter--room temp
1/2 cup cream cheese--room temp
1 cup light brown sugar--lightly packed
1/3 cup granulated sugar
2 large eggs--room temp
1 tsp kosher salt
1 tsp vanilla
3 large over-ripe bananas (about 1 1/2 cups mashed)
1 cup sour cream
2 3/4 cup all purpose flour
1/2 tsp ground cinnamon
1/4 tsp ground nutmeg
1 tsp baking soda
1 tsp baking powder
1 1/2 cups toasted walnuts
cream the butter, cream cheese together, until they are melded together.  add the brown, granulated sugar and salt and beat until fully creamed, and light and fluffy. add the eggs and vanilla and beat until fully incorporated, about 2 minutes...you do not want it to be light and airy, as you are making a bit of a dense, moist bread. toss in the mashed bananas and again mix for about 2 minutes.   mix together the flour, cinnamon, nutmeg, baking soda and baking powder together in a bowl.  with the mixer on low, alternately add the flour and sour cream, beginning and ending with flour, in 3 parts.  mix the walnuts in by hand.  pour into 2 loaf pans that have been buttered and floured.  bake in a preheated 350 oven for about 50 minutes or until a toothpick inserted in the center comes out clean.
*note: the spices of cinnamon and nutmeg are not clearly noticeable in this recipe, they just give the cake a bit of depth. if you love the taste of either one, you can increase as you see fit.  i like the roundness a bit of spice gives without it overpowering the banana flavor.
oh
that little whipped indulgence you see sitting along-side the bread
that is
just 
equal parts crunchy peanut butter
and
softened cream cheese
topped with a bit of honey
just a little schmear
for those of us who
think Elvis knew what he was doing

Tuesday, July 20, 2010

Tuesday Night Supper Club--BLTs with a bit of sophistication

my larder is nearly empty
but my garden is nearing full
and the heat is starting the wear on me
which is why
we are having bacon, lettuce and tomato sandwiches
for dinner
but an adult version
with crispy bread, and thick bacon
freshly picked heirloom tomatoes
garden arugula
and homemade basil, roasted garlic aioli
this is definitely,
not your mama's b.l.t.
and if it is...
then 
i really want to meet your mama!
Basil Garlic Aioli
2 large egg yolks--room temperature
1/4 cup coarsely chopped basil leaves
3 cloves of roasted garlic--roughly chopped
salt and pepper
2 cups (approx) lightly flavored olive oil
squeeze of lemon juice
put yolks, basil, garlic, pinch of salt and pinch of pepper in food processor or blender. whirl until smooth.  slowly drizzle olive oil until mixture comes together and becomes thick and creamy.  add the lemon squeeze and adjust seasonings.
--if you are worried about serving raw eggs to your friends and family, you can take the basil leaves and garlic and whirl in a blender or food processor until they form a paste.  add a bit of lemon zest for freshness, then stir into prepared mayonnaise. you should not need the salt and pepper.

Saturday, July 17, 2010

pulled pork sliders

i love the movies
as a matter of fact
hubster and i have a standing date on tuesdays
a matinee and bucket of popcorn

but on saturday past
we changed it up a bit
and went to an evening show
outside
in a cemetery
with a 
picnic

blanket and picnic baskets in hand
we settled in to watch
(cary grant, ooh la la)
there really isn't a recipe for these...
i used leftover pork ribs that i tossed in a bit of
really yummy vinegar based bbq sauce
that i got at central bbq
and i put it all on some dinner rolls
so simple, but so delicious
and great for a picnic

Wednesday, July 14, 2010

zucchini gratin and fried blossoms


our garden is bursting at the seam
the zucchini is dutifully turning out lots of squash
and 
even more flowers
i used both of them for our dinner tonight
and now
 i
am bursting at the seam
zucchini gratin
(printable recipe)
this recipe is my version of a wonderful eggplant gratin that ina garten makes
olive oil for frying
3 or 4 small-ish zucchini sliced 1/4" thick (you want to make 2 layers in your baking dish)
1/4 cup part-skim ricotta cheese
1 large egg
1/4 cup evaporated milk (you can use milk, half and half or cream)
1/2 cup grated parmesan cheese plus more for topping
handful of fresh basil, torn or cut into chiffonade
salt and pepper
1/2-3/4 cup marinara sauce (ina uses bottled and so why shouldn't you?)
heat the oven to 375.  heat the olive oil in a skillet...put enough to cover the pan and then another glug or two.  once the oil is hot, place the zucchini in batches in the oil and fry until they lightly brown. drain on paper towels.
in a small bowl, whisk together the ricotta 1/2 cup grated parmesan, egg, milk, basil a pinch of salt and a pinch of pepper.  
in the bottom of a small gratin or baking dish, place a bit of the marinara sauce. just put enough to discourage sticking.  layer the zucchini in two layers. sprinkle a bit of parmesan in between the layers of zucchini.  top the zucchini with more sauce.  you can be light or heavy handed here..whatever you like. i like sauce, so i have a heavy hand.  pour the ricotta cheese mixture on top and then sprinkle a bit more parmesan on top...just a light dusting.  bake for about 30 minutes until it is bubbling and beginning to brown.  let cool about 15 minutes before serving and eating.
but wait
there's more
this is the bonus round
fiori fritti
(printable recipe)
a summer staple in any self-respecting italian household
zucchini flowers--cleaned and destemmed
filling:
the possibilities are endless
you can use nothing or you can fill with
mozzarella cheese
ricotta cheese
manchego cheese
sausage
artichoke pate
or cheese and
basil
sage
sundried tomatoes
olive tapanade
anchovies
..and many more

today i used a bit of fresh mozzarella and fresh basil
place in the middle of the flower and then fold the flower to cover completely
and you are ready to dip and fry
make the batter:
1/3 cup flour
1 egg
pinch of salt
pinch of pepper
1/4 cup sparkling water
2-3 ice cubes
more salt for sprinkling on the fried goodies when they come out of the oil
whisk together the flour, egg, salt, pepper and sparkling water.  add the ice cubes and place in the fridge while you heat the oil and prepare the flowers. the trick for a crispy batter is to have it very cold.

place about 6" of vegetable oil in a sturdy pot---careful to leave another 3-4" from the top of the oil to the top of the pan for safety.

dip the stuffed flowers in the batter and let the excess run off.  fry in the hot oil until begins to brown and is quite crispy.
*i also dipped and fried some sage leaves and a few small zucchini


Tuesday, July 13, 2010

reHashed

i had some leftover filling from the dumplings
and a hungry household
so
i played around a bit
and made an
asian flavored egg and hash breakfast

what i have to offer on the subject is
it seems
 i do love breakfast food 
after-all
i took the filling recipe from here
and coated it with instant potato flakes 
(yes, i do keep them in the pantry; because you never know)
and  fried it in a bit of olive oil
until the potato was brown and crunchy, 
and the pork was cooked through
and  then
i placed it on a bed of pan-fried spinach

using the same pan (after wiping it clean),
 i added a bit more olive oil and cooked the egg in a cookie cutter
like so
tip: if you do this, put a cover on, and then the white will cook before the yolk hardens
the yummy looking crunchy squares you see are simply,
 wonton skins deep fried to crispy goodness 
and they are surprisingly good for dipping into the soft and creamy yolk
*add a little hot mustard and/or chili sauce to zest it up a bit

make this
you won't be sorry


Monday, July 12, 2010

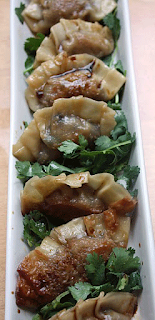
Tuesday Night Supper Club--Potstickers

if i am to be honest
i would have to admit
that i could eat potstickers and dim sum
every day of the week
they are a weakness of mine
i make them by the tray-full
and keep them in the freezer
for
nights when we only want a light supper
or
to pop in a bit of chicken broth for a great soup
or
for a quick appetizer when friends stop in

they really are simple to make
and use mostly pantry friendly ingredients

Pork Potstickers
(printable recipe)
1 lb ground pork
2 tsp finely minced fresh ginger
2 tsp finely minced garlic
1 cup finely chopped mushrooms
1 tsp grated orange peel (i use a microplane)
1/4 cup finely chopped red bell pepper
1/4 cup finely chopped carrot
1 cup chopped fresh spinach
1 scallion--finely chopped
2 eggs
1 tsp salt
1 tsp pepper
3 Tbs light soy sauce
2 Tbs mirin or seasoned rice vinegar
1 tsp chinese chili sauce
1 tsp ponzu sauce or lemon juice
1 tsp cornstarch
 1  package ready made potsticker/dumpling skins or wonton skins cut with a cookie cutter to make round
in a small bowl, mix together soy sauce, mirin or rice vinegar, chinese chili sauce, ponzu or lemon juice and cornstarch, set aside

in a bowl, place the ginger, garlic, mushroom, orange peel, red bell pepper, carrots, spinach and scallion. mix to combine--the above photo shows how fine to chop the veggies.  add the pork, salt, pepper and egg and reserved soy sauce mixture and mix with your hands to fully combine.  
to assemble: fill a small bowl with a bit of water
place a small amount of pork mixture in the center of the dumpling wrapper and with your finger brush a bit of water around the edges
fold the wrapper in half, to form a half moon shape
make folds by tucking and pinching along the sealed edges. be careful not to overfill the dumplings
place on lined and cornstarch dusted sheet pans.  at this point you can freeze like this. once the dumplings are frozen solid, remove from the sheet pan and store long term in a freezer bag.
to cook:  you will need a bit of olive oil and about 1/2 cup of liquid...vegetable or chicken broth, or a combination of broth and water...or just water is fine too (for 10-12 potstickers).  you will also want to mix up a dipping sauce. i like to do a ratio of 3:1 light soy sauce and seasoned rice vinegar with a dash of hot chili pepper sauce.  mix and dip.
place a large skillet over medium heat.  pour in enough olive oil to just coat the bottom of the pan, you are not deep frying.  once the oil is hot, toss the potstickers--fresh or frozen into the pan...and let cook until you see the bottoms are getting brown and crispy.  at this point, toss in your liquid and shake the pan a bit to let them slide around.  there should be a good bit of liquid in the pan so that the potstickers can steam...if you need more, add more.  cover the pan and let cook until the meat is fully cooked and the dumplings are nice and supple.  Serve hot with dipping sauce.

Wednesday, July 7, 2010

yogurt pops

summer is in full swing
and it is hot, hot, hot
which is the perfect weather 
for frozen treats
these are guilt free
but taste oh so sinful
enjoy a handful after dinner tonight!
frozen yogurt pops
(printable recipe)
2 cups fruit
2 cups plain non-fat yogurt (i use greek yogurt)
1/2 cup sugar
juice from 1/2 lemon
1 tsp vanilla
pinch of salt


process the fruit, juice, salt and vanilla in a blender or food processor until pureed.  at this point, if you don't like seeds in your pops, strain. pour in yogurt and pulse a few times.  taste for sweetness and add additional sweetener if needed.  pour into popsicle molds, or dixie cups and freeze.


I am participating in alphabe-thursday
over at


you should go check it out
and see what all the fun is about
this week
sponsored by the letter Y

for a bit of fun, i dipped the pops in flavored sugar candies

watermelon and lemon confit

we just returned from an exploration
okay, a road trip 
exploring the South
where i tasted my fair share of good things
and probably your share too
one late evening in new orleans 
hubster and i 
found ourselves hungry 
and anxious to try alligator
after a quick search on his phone
hubster found
which is not famous for alligator
but serves it none-the-less
but this story is not about alligator
it is about a last minute decision
to try the ribs
which was quite possibly
the best ordering decision
 i have made in a very long time
cochon might just have
 the best ribs i have ever tasted
no lie
the sauce is a secret
but i did buy a few bottles for my personal eating pleasure
now here is where the watermelon comes in
on top of the lightly sauced, wood-fired ribs
was a watermelon rind pickle-slash-preserve
i didn't like it
too heavy on the star anise 
(or something...not quite sure)
but i loved the idea 
of a watermelon pickle-slash-preserve on my ribs
so i set out this morning to make a watermelon rind confit
that will go just as nicely on my wood-fired pork ribs
as it will on my morning scone
here's the other thing
it is pretty too!
Watermelon Rind and Lemon Confit
(printable recipe)
this recipe requires some time
4 cups watermelon rind--cubed
water
1/2 cup kosher salt
peel the rind and cut into dice.  place in a large bowl and cover with cool water. add 1/2 cup kosher salt and let sit overnight (or 8 hours) soaking. drain in colander and discard salt water.

8 cups water
1 Tbs vanilla extract
2 lemons, thinly sliced
1 bay leaf.
7 cardamom pods, lightly crushed
1 knob (about 1" ginger)
place drained watermelon rind in large pot and cover with 8 cups water.  add vanilla, lemons, bay leaf, cardamom pods, and ginger. bring to a simmer and let cook for about 30 minutes, or until the watermelon rind begins to soften.  drain into a colander reserving 2 cups of the liquid.  remove lemon seeds, cardamom pods, ginger and bay leaf.

2 cups reserved water
drained watermelon rind and lemon
2 Tbs marachino cherry juice (for color--optional)
2 tsp finely minced fresh ginger
1/2 tsp ground cardamom
4 1/2 cups sugar
place all in the same large pot and simmer until the watermelon and lemon rind are clear and candied, and sugar syrup is quite thick (like corn syrup).  this can take several hours on low. do not let the sugar caramelize.  place in jars and process as if canning jam or keep in refrigerator for several weeks.

I will use mine with meats as well as on panna cotta, simple lemon cake and lemon ricotta pancakes.  I also intend on giving small jars of this as gifts this winter--summer need not end!

Tuesday, July 6, 2010

Tuesday Night Supper Club--Hoisin Chicken Spring Rolls

i have been craving Asian flavors for weeks
clean, energizing flavors
tonight
i satisfied my craving
with this very quick and healthy meal

Hoisin Chicken Spring Rolls
(printable recipe)
1" fresh ginger--finely chopped
2 cloves garlic--finely chopped
1 scallion--finely chopped
1 portobello mushroom--chopped
1/2 lb ground chicken
olive oil
1 Tbs soy sauce or tamari
2 tsp hoisin sauce
1 Tbs water (or more if necessary)
1/4-1/2 tsp chinese chili sauce
juice of 1/2 small lime
salt and pepper to taste
to assemble
12 small rice paper wrappers
2 cups maifun noodles (softened)
1 cucumber--fine julienne
1 carrot--fine julienne
1 scallion--fine julienne
1/2 red bell pepper--fine julienne
hoisin sauce
cilantro
in a skillet, heat a bit of olive oil.  quickly saute the garlic, ginger, mushroom and chopped scallion for a few minutes. do not let the garlic brown.  add the chicken and saute on low until the chicken is cooked through.  add the hoisin, water and soy sauce and cook until all meat is coated. remove from heat and let cool.  
place the rice paper in water according to package directions.  on each softened rice paper, place some cilantro, then the noodles.  layer the vegetables and about 1 generous tablespoon meat.  top with a bit of hoisin (optional), and roll the paper like a burrito.  serve immediately or refrigerate until ready to eat.  serve with a rice salad or on top of an Asian style green salad
EAT UP!

Friday, July 2, 2010

bringing home the bayou {beignets}


we just returned home from a road trip through the south

and boy do i have a lot of work to do
testing recipes 
in an attempt to duplicate
the wonderful things we ate
and writing thank you notes
to the wonderful friends new and old
who took us in
and filled our bellies

i was smitten, from my first bite
pillowy-billowy-sugary bliss
no matter how touristy, 
remains 
the beignet gold standard

introducing my husband to the decadent treat
during our recent stay in new orleans
delighted me

waking up this morning
to a breakfast of freshly made beignets
delighted him
1 1/2 cups lukewarm water (about 100-105 degrees)
1/2 cup + 2 Tbs granulated sugar
1 1/2 Tbs active dry yeast (1 1/2 envelopes)
2 large eggs--slightly beaten, room temperature
1 cup evaporated milk, room temperature
1/4 cup unsalted butter--melted
6-7 cups bread flour
1 1/2 tsp kosher salt
peanut or other frying oil

mix the water and sugar in a bowl, then sprinkle the yeast on top and set aside for about 5 to 10 minutes.  the yeast should begin to bubble.  if it does not, your yeast might be bad....allow it to sit for 5 more minutes. if it does not start "feeding", then discard and start again.
meanwhile, whisk together the evaporated milk, eggs, salt and melted butter.
after 10 minutes or so, add 3 cups of flour to the yeast mixture and beat with a wooden spoon until it is well incorporated.  add the evaporated milk mixture to the flour mixture and beat with a wooden spoon.  Add 3 more cups of the flour and until all flour is incorporated. you are not making bread, so you do not want to knead too much.  Turn the dough (it should be a bit sticky), onto a floured surface and gently  pat in enough flour that will allow you to handle the dough, but do not aggressively knead it.  place in an oiled bowl and cover tightly with plastic wrap.  place in warm place to double in size (alternately, you can place in the refrigerator overnight to rise).
when you are ready to fry up a batch of beignet, heat your oil to 370F.  roll your dough out to 1/2" thick, using a bit of flour if necessary to prevent sticking. cut dough with sharp knife or pizza cutter into squares (i like mine big).  let cut pieces sit about 5 minutes before frying in the hot oil (i do this so the yeast starts working again, so i get nice air pockets when i fry em up).  fry until golden, it will take just a few minutes.  do no overcrowd the pot.  let drain on kitchen paper and serve with copious amounts of powdered sugar.
and of course
a cup of cafe au lait.
and then
let out a howl
that would make
at cafe du monde

LinkWithin

Related Posts with Thumbnails
 

blogger templates |