Showing posts with label holiday. Show all posts

Monday, January 14, 2013

scottish kilt placemats {in the craft room}

i'm planning a burn's night supper
it happens on january 25th
and is a night of 
literature, revelry
and
haggis

i thought it might be fun 
to have place settings
that match the theme

plaid and kilts
seem very scottish to me
*these are time consuming, but easy for anyone with basic sewing skills. if you have any questions about the tutorial or method, please leave me a comment and i will get back to you in a jiffy


Thursday, December 6, 2012

gingerbread construction {tips and tricks}

what is so wonderful about 
gingerbread houses
is that they are always
magical
even when they are a 
big. fat. mess
some years
i do an elaborate construction
(with assistance from hubster-of course)
like this
and sometimes
like this
and occasionally
simple 
like these
but no matter how
elaborate or simple
there are a few things that
are a constant
and 
important
today
i am sharing with you
some of my tricks
for stress free gingerbread house construction

Making Plans
-let the gingerbread dough rest in the refrigerator overnight before baking
-do not construct the house on the same day you have baked the gingerbread, give it a day to cool and settle
-if you buy pre-made gingerbread pieces, make sure they are dry before decorating or constructing
-to dry pieces out (especially in humid environment), place them on a cookie sheet and place in a slow (225-250F) oven until they firm up

Construction Management
-if using a purchased kit, do not, i repeat, do not use the frosting that comes with the kit to assemble the house. it will frustrate the dickens out of you.  make a nice big batch of Royal Icing (alton brown's recipe)
-if you are decorating with mainly candies and sprinkles, construct the house at least 12 hours before decorating---24 hours is best
-if you want the candies to stick, use royal icing.  if you want them to taste yummy, use frosting.
-assemble the walls of the house first, allow to dry for about an hour, then attach the roof pieces.
-prop the pieces up while they are drying, even if it looks like they are staying without a problem.
-allow the house to fully dry, before adhering it to a base

Custom Built
-if perfect corners and straight edges are your thing, use a micro-plane to shave the ends of the gingerbread pieces.
-if looking for a darker hue on your gingerbread, or to paint gum pieces to look like hardwood floors, simply mix a bit of coffee granules into vodka to desired color and consistency and paint it on.  the vodka will evaporate quickly.
-when piping intricate details, use a piping bag with a tip.  you will get consistent results and small detailed lines.
-when using the piping bag, do not over-fill, particularly if you have small hands.  put no more than a cup of royal icing in at a time.
-if you make a mistake and it really bothers you, wait until it dries to easily pick it off
-when doing intricate detail work, it is best to decorate the house before constructing. it allows for more freedom of motion

but most of all
have fun!

i would love to hear any tips you may have for stress free gingerbread construction
or
if you have a question about this topic that i didn't answer
please feel free to ask in the comments

Wednesday, January 11, 2012

heart palmiers

we have neighbors
with fabulous taste

crown molding
silver service
art gallery lighting
kind of taste

i almost wonder
if hubs and i 
are their pro-bono friends

while residing in california
we rang in 
london's new year
together
complete with

champagne
caviar
and
crown roast

imagine my horror
as i catch
from the corner of my eye

hubs

in all his glory
hands full of palmiers
flaky crumbs falling to his beard
a smile as broad as his shoulders
complimenting the hostess
on her fabulous dessert

turning to me
gave a grand wink
and said
"you should make these"

so i did

   simple easy heart palmiers
1 sheet puff pastry--cold but not frozen
2 Tbs unsalted butter--melted
2 Tbs granulated sugar
1 1/2 tsp cinnamon
1/4 cup granulated sugar for dipping

place puff pastry on a sheet of parchment. in a small bowl, mix together the 2 Tbs granulated sugar and 1 1/2 tsp cinnamon. using a pastry brush, brush the butter evenly covering the entire piece of pastry. evenly and liberally sprinkle the cinnamon sugar on top of the butter. measure or eye the center of the puff pastry and gently score with the dull end of a knife (do not cut through) starting on one end, tightly roll the dough to the center.  roll the opposite end to the center, forming what looks like a scroll.  gently press together, and if you would like an exaggerated heart shape, pinch the bottom to a point.  wrap in parchment and/or plastic wrap and place in the refrigerator to chill. after 1 hour and up to 24 hours, preheat the oven to 375F.  line a cookie sheet with parchment paper.  place the remaining 1/4 cup sugar in a saucer or shallow bowl. remove the dough from the refrigerator and slice crosswise in 1/4" sections.  reshape as necessary, then dip both sides in the sugar. place on parchment paper approximately 1" apart. bake for 12-15 minutes or until golden brown and crispy.  allow to cool a bit, but not fully before removing from the parchment.  the sugar will cause them to stick if they cool too much.  allow to finish cooling on a wire rack.

eat with abandon!

linking up to

504 Main--tickled pink


Monday, December 26, 2011

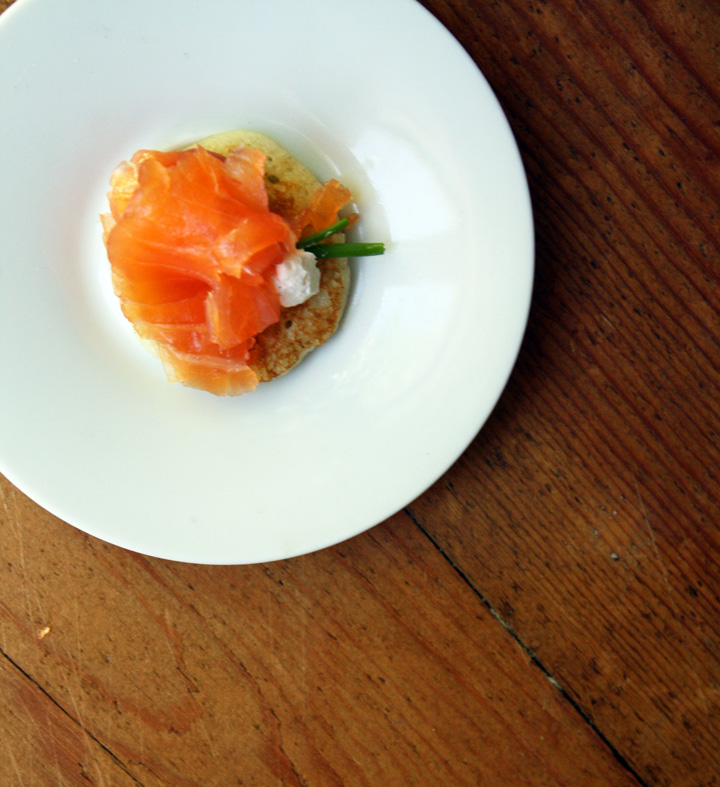
gravlax

we had a gorgeous feast 
for 
christmas dinner
a feast
of seven fishes
actually
i was excited to present
home cured
gravlax
during cocktails

many years ago
before i had cable
leaving me with 5 channels
(and surprisingly a lot more interesting tv)
i watched a lot of julia child on pbs
each episode
numerous times
an episode i distinctly remember
is one where she made gravlax with a seattle chef
i was amazed
but never actually made it

truthfully
i'm not much a fan of salmon
but this
this gravlax
is something really special

pure in flavor
sweet
salty 
briny
fresh

my family
never shy to poke fun
was primed to make bait jokes
but
 found it difficult
to utter much of anything
through their stuffed gullets
 
 gravlax
this takes several days to cure, plan accordingly

1 1/2 lbs fresh salmon filet (you must use salmon in season)
1/2 cup kosher salt
1/4 cup brown sugar
1/4 cup vanilla sugar*
1 Tbs grapefruit zest
1 heaping Tbs pink peppercorns
1-2 sprigs thyme

rinse and dry the salmon filet.  line a casserole dish with plastic wrap, overlapping considerably.  place salmon filet in dish.  in a bowl mix together the salt, vanilla sugar, brown sugar, grapefruit zest, peppercorns and thyme.  coat the salmon heavily with the mixture...be generous and make sure the entire surface is covered. close the salmon in the plastic wrap, making sure it is well covered. 
 place a board or casserole dish on top of the fish, then use cans or bottles to weigh it down.  place in the refrigerator for 24 hours.  
after 24 hours, remove the weight, open the plastic wrap, you will see that the sugar and salt are now liquid, use it to baste the fish. wrap again in plastic and place the weight back on.  place in the refrigerator for another 24 hours.  on day three, repeat the process.  on day four, your fish will be cured (if you are using a larger piece of fish, it may well take a bit more time).  your fish should be firm and have become a bit deeper in color.  remove from the cure and gently rinse with very cold water.  dry.  slice off a thin piece and taste.  if it is overwhelmingly salty, place cold water in a casserole dish and put the fish in meat side down. cover and place in refrigerator and let sit for 1 hour.  remove from water and taste again. if the fish is still unbearably salty, soak it again for a maximum of 1 hour.  

serve with blini, creme fraiche and dill or chives

*to make vanilla sugar, whirl 1 cup granulated sugar with 1/2 dried vanilla bean pod in a food processor. 

Saturday, April 23, 2011

easter bunny


want the beauty of a
white chocolate
easter bunny
with the taste 
of 
deep brown
bittersweet chocolate
?

me too

which is why
dipped my 
bunny
in 
royal icing

now
 it has a
hard candy coating
and
looks like
italian pottery

i love it so much
it might never get eaten

Happy Easter


Friday, March 11, 2011

st. paddy's cake

i do enjoy
a snazzy chapeau
especially
if it is edible
this is a simple 7" layer cake
placed on a 10" cake round
place the fondant covered cake in the middle of the round
roll out a strip of fondant wide enough and long enough for the brim, curling up the edges.
using a brush, paint a bit of water on the round (only a little) to help the brim stick and carefully place along the edges of the cake
the shamrocks are fashioned from lightly colored fondant cut out with a cookie cutter. i softened the edges a bit with my fingers to give them a bit of movement.
the buckle is simply rolled fondant covered in edible gold leaf, then brushed with a bit of bronze luster dust. 
i used just a bit of water to adhere all the elements onto the cake

if you would like more details or further instruction on how i made this
please ask
i promise i won't tell you
that a leprechaun left it behind
at the pub i frequent

i am linking this up to 

Thursday, February 3, 2011

rock candy

my kitchen has been looking like a science lab lately
not because 
it is pristinely clean
with
clutterless counter tops
and
nerdies wandering around
but because
i have been making
rock candy
several attempts
i might add

it all started out innocently enough
sugar
water
string
but then
i got sassy

like i am debeers or something

i thought it would be
fun and cheeky
to make
rock candy jewels
something 
for a
big night out

i settled on 
 drop earrings
simple, right?

here is the rub
the fun flew faster 
than a spy plane
out this nerdies door
while
obsessive took its place

in the end
i got the perfect pair
 
now
i'm not sure
if i should
 wear or eat 
them
rock candy
(printable recipe)
2 cups water
4 cups sugar
food coloring (optional)
up to 1 tsp flavoring (optional)
baker's twine 
granulated sugar
cut the baker's twine to desired length. tie the twine off to a wooden skewer or pencil.  this will allow you to suspend it in the syrup. Dip the twine in water, then roll in a bit of granulated sugar to coat.  allow to dry while you make the syrup.
bring water and 1 cup of sugar to a simmer in a saucepan.  while the water is still simmering, add sugar, 1 cup at a time, stirring and ensuring the sugar has completely dissolved before adding the next cup.  once all sugar is incorporated, remove from heat and add coloring and flavoring.  allow the syrup to cool slightly, then pour into a clean and sterilized glass jar or tall glass.  you will need a separate glass for each rock candy you want to make.
suspend the twine in the syrup being careful that it does not touch the bottom or sides of glass.  crystals should begin to form in about 4 hours.  if there is no activity within 24 hours remove the twine, pour the syrup back into a pot and heat to a simmer.  return to the clean and sterilized jar and start again.  if you see excessive crystallization on the sides of the jar or glass, remove the twine and perform the above steps, otherwise you will have a glass full of hard sugar crystals.  
check your twine daily. when you have the rock candy of your desire, remove from the syrup and allow to hang dry for a few hours.

Sunday, January 23, 2011

conversation hearts

valentine's day
wouldn't be complete
without a conversation
through
candy hearts

i remember the days
when hearts were carefully shared
making sure
i love you
didn't get inadvertently passed
to a
4th grade crush

also important

sharing only
the good flavors
anyone would shudder
to see
the object of her affection
chewing up and spitting out
her heart

ten years old
is too young
to fully understand
foreshadowing

this year
i am confident 
that hubster
will appreciate
an 
i love you
or three
in such flavors as
orancello
coconut
green tea
almond
anisette
coffee
and
vanilla bean 
 conversation hearts
(printable recipe)
1/4 oz gelatin
1/2 cup water
2 tsp light corn syrup
2 lbs powdered sugar
cornstarch
flavorings
color
rubber stamp kit or food color pens
place water in a bowl and sprinkle gelatin over.  let bloom.  add the corn syrup and gently cook in the microwave until the gelatin and corn syrup have melted.  do this in 20 second intervals. mix the gelatin mixture into about 2/3rds of the powdered sugar.  knead with your hands, adding more powdered sugar as necessary until the dough is satiny and doesn't stick to the counter.  divide the dough into 6-8 pieces, coloring and flavoring as desired.  keep tightly wrapped in plastic wrap, as this dough will dry out quickly.  keep some powdered sugar on hand, in case adding color and flavor makes the dough sticky.
  roll the dough out and cut with small heart cutter. 
 place on a cornstarch dusted sheet pan and let dry a minimum of 48 hours.
when ready to decorate, use food color based pens, or brush food coloring directly onto a rubber stamp with the words spelled backwards.  press the heart onto the stamp and let dry about 15minutes.  you can also paint food coloring directly onto the heart as well.
i used this stamp set for most of mine

these are so much fun to make
i think 
a robin's egg blue box 
full of 
marry me hearts
would be a darling
proposal
or
a love poem
stamped out
word by word
heart by heart
snaked down
the dining room table
as a simple but thoughtful
centerpiece
the possibilities are endless
Just. Like. Love

i am linking this up to
rook no 17
a little birdie told me

Tuesday, January 11, 2011

happy heart cupcakes

i love it when i make things
that look familiar
but taste delicious

it is not so difficult
when making 
mock store-bought treats
for these
hostess like cupcakes
i used the recipe
i shared for 
homemade
ding dongs
found here
instead of loopdy loops
i made
loopdy hearts
from tinted royal icing
these are tiny
just one bite
so cute 
for a lunch box treat
or 
as an after dinner mint
  (just flavor your ganache or filling)
treat yourself to a
plateful! 

Wednesday, January 5, 2011

40 clove ham

i find it curious that
some of the biggest insults we toss about
 malign an animal 
that brings such great pleasure
things like

don't be a pig
he's swine of the worst kind
this place looks like a pig pen

are part of our common vernacular

rather than
being nasty about the plucky porcine
we should be saying things like

your skin has the milky creaminess of caul fat
and honestly,
who doesn't think 
crepine
is a beautiful name for a girl

wandering the grocery store
looking for inspiration for our new year's eve buffet
i found a ham
on sale, no less
and couldn't resist
the swine song
of a
well spiced
lightly sweet
and
mouth-watering salinity
of the
ham of my dreams
40 clove ham
(printable recipe)
10 lb bone-in ham (cooked or uncooked)
1/4 cup pork spice rub--my recipe here...or use your favorite
1/2 cup honey
2 Tbs spiced rum
1/2 cup dark brown sugar
1/4 tsp kosher salt
juice of 1 orange
2 Tbs cider vinegar
2 tsp pork spice rub
40 whole cloves
cut diamonds into the pork fat and rub with spice rub. randomly stud with the whole cloves.  bake for 1 hour in large roaster on a rack.  baste each 30 minutes with sauce.  bake at 350 until thermometer reads 145 (if using a cooked ham) or 160 (if using an uncooked ham).  let rest 20 minutes.  slice and eat

* a cooked ham will take about 15-18 min per pound. an uncooked ham will take about 18-22 minutes per pound.  you do not want a canned ham for this. this is meant to resemble a honey baked, or spiral ham...but i think this is much better a quite cost effective.

Wednesday, December 22, 2010

italian fig cookies

to be honest
this is more of a st. joseph's day treat
than a christmas one
but
truth be told
they are good
any time of year
be warned
this is not a fig newton facsimile
these are spicy and heady and filled with riches
wrapped in a buttery italian pastry
called
pasta frolla
my presentation isn't typical either
they are usually rolled in a tube-shape 
and cut in sections

on a cookie tray
i find them to stay fresh a bit longer
when presented like this
italian fig cookies
cucidati
(printable recipe)
pasta frolla
4 cups flour
2/3 cups granulated sugar
1 tsp baking powder
1 1/4 tsp kosher salt
1 cup unsalted butter--cold and cut into pieces
4 large eggs
1/2 tsp vanilla
using a food processor, pulse together the flour, sugar, baking powder, and salt a few times to ensure fully mixed.  drop in the butter and pulse until the butter has incorporated completely turning the mixture into a powder.  add the eggs and vanilla and continue to pulse until the dough forms a ball.  remove and wrap in plastic wrap and place in the refrigerator for a few hours or overnight. 
filling
12 oz dried figs (i use calimyrna)
1/2 cup currants or raisins
zest of 1 orange finely grated
1/3 cup blanched, slivered almonds--toasted
1/3 cup bittersweet chocolate--cut into pieces or chips
3 heaping Tablespoons apricot preserves
3 Tbs dark rum
1/2 tsp ground cinnamon
light pinch ground cloves
1/4 tsp ground nutmeg
egg beaten with a bit of water for egg wash
powdered sugar glaze or royal icing for decoration
sprinkles for decoration
if the figs are hard and dry, place them in a bowl of hot water to soften, drain and then proceed with recipe.   dice the figs and place in a bowl with the rest of the ingredients. stir to fully incorporate. place the entire mixture in the food processor, fitted with steel blade and pulse until you have a paste.  place in the refrigerator until ready to use.
roll the dough out to 1/4" and cut with a small round, plain or scalloped cookie cutter. place just a small bit of fig on top of half the cutouts.  brush a bit of egg wash with a brush on the outer edge of the dough. place a second piece of dough on top and press with tines of fork or toothpick to seal.  brush top with egg wash.  bake at 350 for about 10 minutes. you have to watch to see that they don't burn, you want them just starting to brown on the bottom.
when cool, leave plain or drizzle a bit of powdered sugar glaze (powdered sugar and milk to a runny consistency), or royal icing and add a few sprinkles.  


Sunday, December 19, 2010

chocolate glazed gingerbread

until yesterday
it had been years
since i made
gingerbread cookies 
but
come holiday time
i bake for others
others with specific requests
so
i dusted off my cookie cutter
and scoured my recipe archives
i found a fun idea in
nancy baggett's all american cookie book
for 
a chocolate glazed version
one of my favorite combinations
gingerbread and chocolate is

here's what i have to say
i will give you her recipe
slightly altered 
(it is what i do, i can't help myself)

it produces a firm and crisp cookie
(which i like)
but it lacks a "roundness", another flavor note, i think
i added honey and it is an improvement
and then there is the glaze

it just was NOT chocolatey enough
looking like chocolate
and tasting like chocolate
are two entirely different things
i bumped it up--considerably
i give you the recipe
with the tweaks already in
if you want the original
buy the book
it is worth it
she has some great recipes
chocolate glazed gingerbread
(printable recipe)
(adapted from all american cookie book)
6 1/2 cups flour (plus more if needed)
2 Tbs ground cinnamon
2 Tbs ground ginger *
1 tsp ground cloves
1 1/4 tsp kosher salt *
1/2 tsp baking powder
1 1/2 cups dark brown sugar *
1 cup unsalted butter--slightly softened
2 Tbs corn oil (or other flavorless oil)
1 1/4 cup molasses*
1/4 cup honey*
whisk together the flour, cinnamon, ginger, cloves, salt and baking powder in a large bowl and set aside.  in an electric mixer, beat together the brown sugar, butter, and oil until light and fluffy. beat in molasses, honey and 2 1/2 Tbs water until well blended. beat in half the flour mixture until well blended. stir in the remaining flour. knead the dough until it becomes smooth and shiny. if dough is too stiff, you may add a bit more water, if too sticky, add flour.  divide dough into three pieces. roll each piece in between pieces of wax or parchment paper to 1/4" thick.  place in the refrigerator to firm up (about 3 hours).  when ready to use, peel back the parchment from both sides and using a cookie cutter, stamp out design.  bake on a parchment lined cookie sheet for approximately 6-12 minutes at 350F.  keep a close eye.  let cool, then dip in chocolate glaze
chocolate luster glaze
11/2 ounce unsweetened chocolate--coarsely chopped and melted*
3 1/4 cups powdered sugar
pinch kosher salt*
1/3 cup unsweetened cocoa powder*
1/3 cup water
1 Tbs light or dark corn syrup*
1 tsp vanilla extract
heat the water and corn syrup in a sauce pan, over medium heat until it just comes to a boil.  remove from heat.  sift together the powdered sugar, salt and cocoa powder.  stir the hot syrup/water into the powdered sugar mixture and beat by hand until smooth and shiny.  toss in the vanilla and melted chocolate and beat again until smooth.  dip cookies or use an offset spatula to frost. let cookies sit a minimum of 3 hours to ensure they are set.  decorate as desired. 
the ingredients marked by * have been altered, or added by yours truly.


Saturday, December 18, 2010

iced and snowy stars

i love this shortbread recipe
and use it shamelessly
whenever i can
it is seen here
rolled into a rainbow of happiness
every christmas
mom would bring out
special cookie cutters
the ones she used for
shortbread 
the mystery still remains
why
they were 
shaped like playing card suits
and how
"spades" and "diamonds"
scream christmas
i never thought to ask

perhaps i should

she rolled the dough out thicker than usual 
slightly underbaked them
and half dipped them in chocolate
and they are perfect that way
still 
my favorite way of eating them

but they are also delightful
rolled a bit thinner
baked a bit crispier 
and
glazed with
ivory tinted
royal icing, 
flavored with a bit of almond
and 
finished with sugar
i make these
and 
mom still makes 
chocolate dipped
and it is hard to imagine
that we both use 
the same dough
shortbread cookies
(printable recipe)
(the original recipe has been passed down through my family, but came-i think-from Paula Peck)
1 cup butter-room temperature
3/4 cup sifted powdered sugar
1 tsp vanilla extract
1/2 tsp salt
2 cups flour
Beat sugar and butter until completely mixed together, but not light and fluffy.  Add vanilla and salt and mix until just incorporated. Slowly stir in flour and only mix until just incorporated.  Divide dough in 2 portions, wrap in plastic and place in refrigerator for a few hours or overnight.  When ready to bake, roll out and bake on parchment paper.  top with sprinkles or leave plain and bake at 325 until just starting to brown on the bottom.
once cooled you can dip in tempered chocolate or glaze with royal icing (alton brown recipe here), flavored as you choose

just a simple tip.  i glaze the cookies using a pastry bag and let them dry.  i then dip a small paint brush in a bit of everclear or vodka (or you can use extract) and gently swipe it across the top. i then immediately sprinkle the sugar on top. the liquid will evaporate almost immediately--but it will allow your sugar to stick without sinking into the icing.


Friday, December 17, 2010

one of santa's?

i know it isn't food--but i had to share
i was browsing through a british mag
a cast off from my cousin
and found the most delightful tableau
from living etc december 2010
and i thought
hmmm
i could probably make that
surprisingly,
 i didn't look at it close enough
as
i see now
that it was a small little table-top picture
mine
is not
my mantle december 2010
but i love it anyway
and hubster does too
now that he knows it is just for the holidays

he was a bit suspect
 and slightly concerned 
i might start making "art"
for the house

this was really simple
i purchased a cheap canvas
painted the background white-white
drew the elk freehand in pencil
and 
painted it burnt umber
 a few strands of battery operated lights
strategically placed and poked through
(a little hot glue to secure)
gives it a sparkly-snowy feel
simple, right?

i was thinking of making eight more
  to line our living room wall
as if i
curate santa's hall of fame

Thursday, December 16, 2010

going to the dogs...

we used to have a dog bakery in our neighborhood
 i would walk past it with a 
humpf
thinking 
people need to get a life
rolling my eyes
as i passed 
perfectly coiffed poodles
with 
their own frequent buyer cards
and suddenly
as if i hadn't just heard myself
i would turn on my heels
go in
and purchase
"just a little something"
for our two pups 

because,
that stuff was irresistible


the shop closed last year
and, not surprisingly
i found
our dogs were happy with any and all treats
post
morning constitution

which is great
but
at christmas 
i like to have something special
for the little rascals

imagine my surprise
when i came across peanut flour
at the local trader joes
i immediately thought
of dog biscuits
i'm silly that way

these are really easy to put together
and apparently yummy
i am not kidding when i tell you
our dogs were pestering me
to lick the bowl

humans can eat these too
but i don't know why one would
they are packed with
healthy goodness
but not
tasty goodness
unless 
you are a dog
or
shipwrecked
stellar treats
(printable recipe)
1 cup peanut flour
2 cups oat bran
2 over-ripe bananas
3 egg yolks
3 Tbs honey
2 Tbs cinnamon
1/4-1/2 cups whole wheat flour
egg white for brushing cookies
sprinkles (optional)
place the peanut flour, oat bran, bananas, eggs, cinnamon and honey in the bowl of a food processor. process until it becomes a dough.  turn onto your work bench and work in enough flour to make a firm dough, that can be rolled out.  if you don't want to use wheat, you can use oat flour for this. roll out to about 1/4"thick and cut with cookie cutter of choice.  place on cookie sheet and brush with egg white. top with sprinkles (if using). bake at 350F for about 20 minutes or until slightly browned.  makes about 60 1 1/2" cookies
dharma is impolite
 and hopes
i don't notice her
unceremoniously gobbling them up
w.d. carefully chooses
and suspects
it might be a trap

because a plate of cookies
on the floor
in the middle of the kitchen
seems a bit
suspicious
even to a dog


i am sharing this at
the tattered tag


LinkWithin

Related Posts with Thumbnails
 

blogger templates |